
On this page
Connect the lab to external threat-intelligence sources, integrate MISP with OTX, and validate safe file-hash enrichment using the VirusTotal API.
Threat Intelligence Integration
At this stage, Splunk can receive endpoint telemetry and MISP can store structured indicators. The next step is to give the lab access to external threat intelligence and reputation context.
This section introduces two intelligence paths:
External Threat Intelligence
↓
OTX
↓
MISP
AND
File Hash / Public Indicator
↓
VirusTotal API
↓
Reputation Context
↓
MISP
MISP remains the central intelligence repository. OTX contributes externally sourced indicators, while VirusTotal provides additional reputation context for supported indicators. In this lab, Python scripts use the requests library to communicate directly with the OTX, VirusTotal, and MISP REST APIs.
1. Give MISP Controlled Internet Access
The host-only network intentionally isolates the lab:
192.168.95.0/24
However, OTX and VirusTotal are external services, so MISP-01 needs outbound Internet access.
Do not replace the existing Host-only adapter.
In VMware, shut down MISP-01, open:
VM Settings → Add → Network Adapter
Configure the new adapter as:
Network Adapter 1: Host-only
Network Adapter 2: NAT
The original Host-only adapter must continue to provide:
MISP-01
192.168.95.131
The NAT adapter exists only to provide outbound Internet access.
This design keeps MISP-01 connected to the isolated Host-only network while providing controlled outbound Internet access through the second NAT adapter.
Boot MISP-01 and verify both interfaces:
ip addr
Then inspect the routing table:
ip route
You should still see 192.168.95.131 on the private lab interface, along with a separate NAT-assigned address and default route.
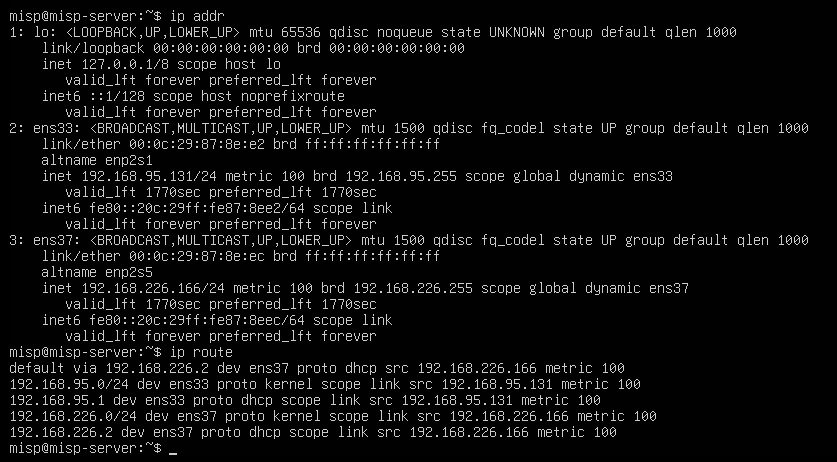
Figure 13. MISP-01 retaining its private lab interface while using a separate NAT interface for controlled Internet access.
2. Verify External and Internal Connectivity
First verify DNS resolution:
getent hosts otx.alienvault.com
Then test outbound HTTPS:
curl -I https://otx.alienvault.com
and:
curl -I https://www.virustotal.com
A valid HTTP response confirms that the server can reach the external services.
Now make sure the new NAT adapter did not break the private lab network:
ping -c 3 192.168.95.133
ping -c 3 192.168.95.132
Both Splunk and TheHive should remain reachable through the Host-only network.
The important design is:
┌── Host-only → Lab systems
MISP-01 ─────────────────── 192.168.95.131
│
└── NAT → Internet
↓
OTX / VirusTotal
3. Prepare the API Credentials
You will need three authentication values:
OTX API Key
VirusTotal API Key
MISP API Key
Create an OTX account and obtain its API key. Subscribe to a small number of public threat-intelligence pulses so there is data available for testing. In this lab, the integration script retrieves subscribed intelligence directly through the OTX REST API.
Create or retrieve your VirusTotal API key.
VirusTotal API v3 accepts the API key through the x-apikey header and supports retrieving an existing file report using a SHA-256, SHA-1, or MD5 hash.
For MISP, use the authentication key created earlier in the MISP Setup section.
Never place any of these keys directly into screenshots or published source code.
4. Prepare the Python Integration Environment
The integration scripts run directly on MISP-01 using Python 3.
Verify Python:
python3 –version
Install pip if required:
sudo apt update
sudo apt install -y python3-pip
Install the HTTP library used by the integration scripts:
pip3 install requests –break-system-packages
The scripts are stored in the MISP user’s home directory:
/home/misp/otx_to_misp.py
/home/misp/vt_enrich_public.py
The integration uses Python’s requests library to communicate directly with the external APIs and the MISP REST API.
5. Store the API Keys Outside the Scripts
Create a protected secrets file:
nano ~/.cti_secrets
Add:
export OTX_API_KEY=’YOUR_OTX_API_KEY’
export VT_API_KEY=’YOUR_VIRUSTOTAL_API_KEY’
export MISP_API_KEY=’YOUR_MISP_API_KEY’
Save the file and restrict access:
chmod 600 ~/.cti_secrets
Load the variables before running the integration scripts:
source ~/.cti_secrets
Verify that the variables are loaded without printing their values:
python3 – <<‘PY’
import os
print(“OTX key loaded:”, bool(os.getenv(“OTX_API_KEY”)))
print(“VirusTotal key loaded:”, bool(os.getenv(“VT_API_KEY”)))
print(“MISP key loaded:”, bool(os.getenv(“MISP_API_KEY”)))
PY
Never display API keys in screenshots, source-code examples, terminal output, or public repositories.
6. Connect OTX to MISP
Create:
nano ~/otx_to_misp.py
Script:
#!/usr/bin/env python3
import os
import requests
import urllib3
urllib3.disable_warnings(urllib3.exceptions.InsecureRequestWarning)
# ============================
# CONFIG
# ============================
OTX_API_KEY = os.environ[“OTX_API_KEY”]
OTX_URL = “https://otx.alienvault.com/api/v1/pulses/subscribed”
# The script runs locally on MISP-01, so localhost is used here.
MISP_URL = “https://localhost”
MISP_API_KEY = os.environ[“MISP_API_KEY”]
# Map OTX indicator types → MISP attribute types
TYPE_MAP = {
“IPv4”: “ip-dst”,
“IPv6”: “ip-dst”,
“domain”: “domain”,
“hostname”: “hostname”,
“URL”: “url”,
“FileHash-MD5”: “md5”,
“FileHash-SHA1”: “sha1”,
“FileHash-SHA256”: “sha256”,
“email”: “email-src”,
“CVE”: “vulnerability”,
}
def get_otx_pulses(limit=5):
headers = {“X-OTX-API-KEY”: OTX_API_KEY}
r = requests.get(OTX_URL, headers=headers, params={“limit”: limit}, timeout=30)
print(“OTX pulses fetch:”, r.status_code)
if r.status_code != 200:
return []
return r.json().get(“results”, [])
def create_misp_event(pulse):
headers = {“Authorization”: MISP_API_KEY, “Accept”: “application/json”, “Content-Type”: “application/json”}
payload = {“Event”: {
“info”: f”OTX Pulse – {pulse.get(‘name’,’Unnamed’)}”,
“distribution”: “0”, “threat_level_id”: “2”, “analysis”: “1”,
}}
r = requests.post(f”{MISP_URL}/events/add”, headers=headers, json=payload, verify=False)
print(“MISP event created:”, r.status_code, r.text[:200])
if r.status_code not in [200, 201]:
return None
return r.json()[“Event”][“id”]
def add_misp_attribute(event_id, attr_type, value, comment):
headers = {“Authorization”: MISP_API_KEY, “Accept”: “application/json”, “Content-Type”: “application/json”}
payload = {“Attribute”: {
“event_id”: event_id, “category”: “External analysis”, “type”: attr_type,
“value”: value, “comment”: comment, “to_ids”: True, “distribution”: “0”,
}}
r = requests.post(f”{MISP_URL}/attributes/add/{event_id}”, headers=headers, json=payload, verify=False)
print(f”MISP attribute {value}:”, r.status_code)
def main():
print(“Starting OTX → MISP sync…”)
pulses = get_otx_pulses(limit=5)
print(f”Fetched {len(pulses)} pulses”)
for pulse in pulses:
event_id = create_misp_event(pulse)
if not event_id:
continue
for ind in pulse.get(“indicators”, []):
misp_type = TYPE_MAP.get(ind.get(“type”))
if not misp_type:
continue
add_misp_attribute(event_id, misp_type, ind.get(“indicator”), f”OTX indicator type: {ind.get(‘type’)}”)
print(“OTX → MISP sync completed.”)
if __name__ == “__main__”:
main()
The script will:
OTX REST API
↓
Python requests
↓
otx_to_misp.py
↓
MISP REST API
↓
MISP Events + Attributes
The integration script uses Python’s requests library to communicate directly with both APIs. It authenticates to OTX, retrieves a limited number of subscribed threat-intelligence pulses, converts supported indicators into MISP-compatible attribute types, and sends the resulting events and attributes to MISP through its REST API.
The script should handle common indicator types such as public IP addresses, domains, URLs, hashes, hostnames, and vulnerability identifiers. Start with only a few subscribed pulses while testing the integration.
7. Run the OTX Import
Run the OTX integration script from the MISP server:
source ~/.cti_secrets
python3 ~/otx_to_misp.py
The script retrieves subscribed OTX threat-intelligence pulses and sends the resulting indicators to MISP through the REST API.
During execution, the terminal should show MISP events and attributes being created successfully. A completed synchronization should end with a message similar to:
OTX → MISP sync completed.
Then open MISP:
Go to:
Event Actions → List Events
You should now see one or more events beginning with:
OTX Pulse –
Open one of the imported events.
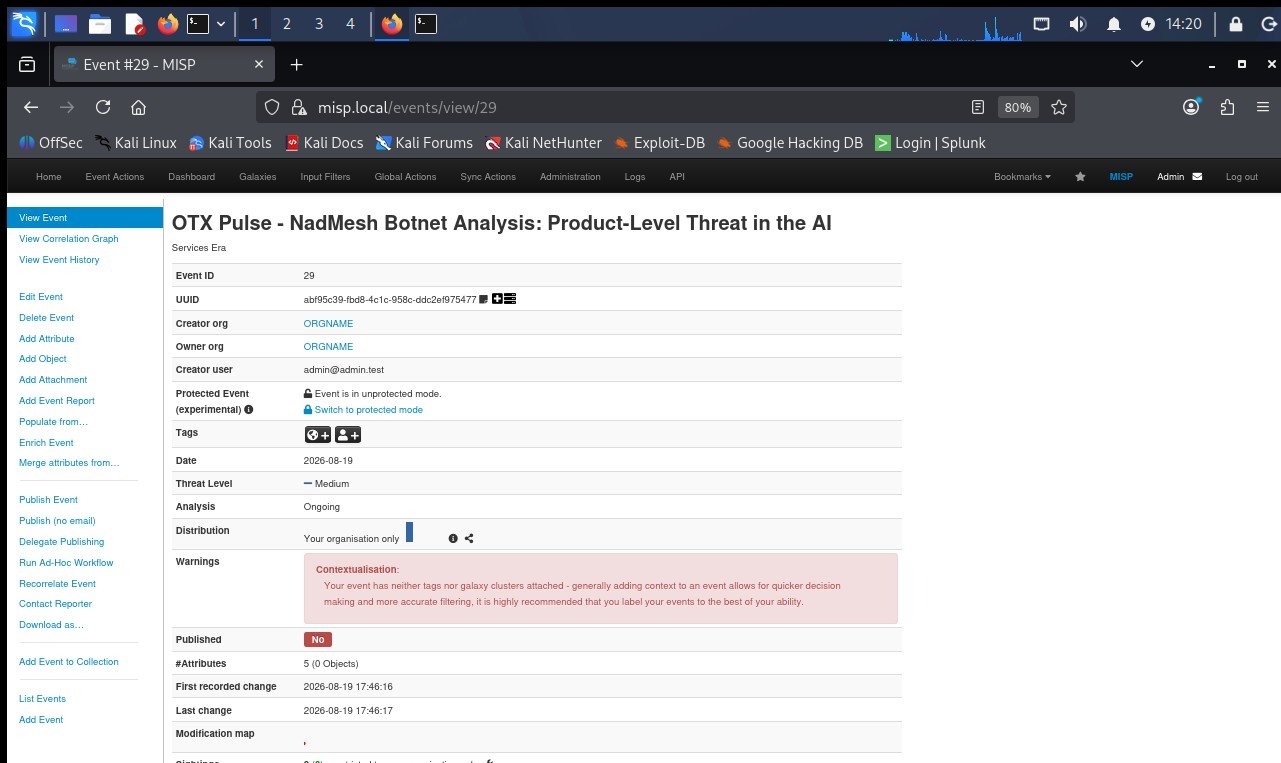
Figure 14. OTX threat-intelligence pulse successfully imported into MISP as a new event.
Opening the event shows the indicators retrieved from the OTX pulse and stored as structured MISP attributes.
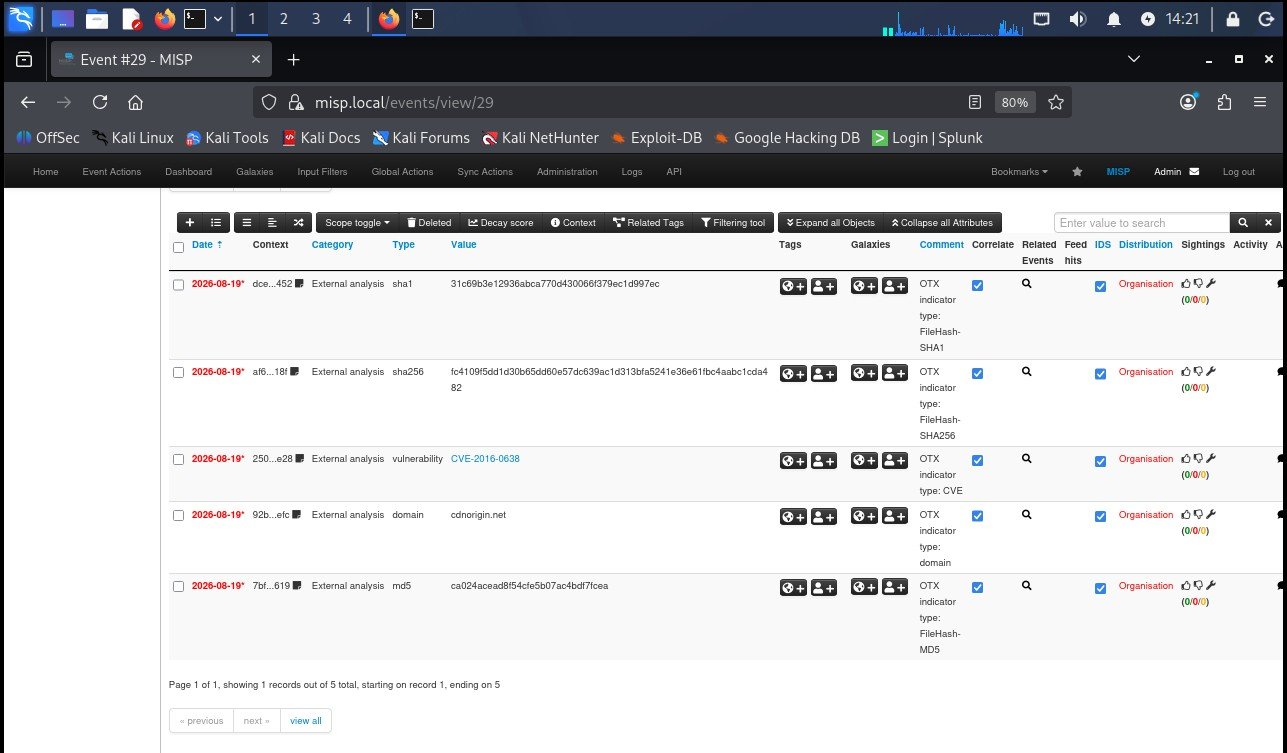
Figure 15. OTX indicators stored in MISP as structured threat-intelligence attributes.
The attributes may include indicators such as:
Public IP addresses
Domains
Hostnames
URLs
Vulnerability identifiers such as CVEs
MD5 hashes
SHA-1 hashes
SHA-256 hashes
This confirms that OTX threat-intelligence pulses can be converted into structured MISP events and attributes for use elsewhere in the detection workflow.
8. Keep Internal and External Intelligence Separate
There are now two types of MISP information in the lab:
External Intelligence
OTX → MISP Events
And
Internal Detection
Splunk → Threat Detection Lab Event
Do not treat every OTX indicator as automatically malicious.
Threat-intelligence feeds provide context, not an automatic decision.
Also do not submit lab addresses such as:
192.168.95.131
192.168.95.132
192.168.95.133
192.168.95.134
192.168.95.135
to public reputation services as meaningful threat indicators.
192.168.0.0/16 is RFC 1918 private address space and is reused across private networks rather than being globally unique.
Use public reputation services for globally meaningful indicators such as:
File hashes
Public IP addresses
Domains
URLs
9. Add VirusTotal Enrichment
OTX gives the lab an external threat-intelligence source.
VirusTotal adds a second function: reputation enrichment.
For a file hash, the workflow becomes:
SHA-256 Hash
↓
VirusTotal API
↓
Analysis Statistics
↓
MISP Event
The enrichment script runs directly on MISP-01. It uses Python’s requests library to query the VirusTotal API and communicate with MISP through its REST API.
This enrichment test uses its own separate MISP event, distinct from the automated-detection event that the Splunk pipeline creates later.
Create the script:
nano ~/vt_enrich_public.py
Use:
#!/usr/bin/env python3
import os
import requests
import urllib3
urllib3.disable_warnings(urllib3.exceptions.InsecureRequestWarning)
VT_API_KEY = os.environ[“VT_API_KEY”]
MISP_API_KEY = os.environ[“MISP_API_KEY”]
MISP_URL = “https://localhost”
FILE_HASH = (
“275a021bbfb6489e54d471899f7db9d1663fc695ec2fe2a2c4538aabf651fd0f”
)
EVENT_NAME = “Threat Detection Lab – Suspicious File Test”
def check_virustotal(file_hash):
url = f”https://www.virustotal.com/api/v3/files/{file_hash}”
headers = {
“x-apikey”: VT_API_KEY
}
response = requests.get(
url,
headers=headers,
timeout=30
)
print(“VirusTotal lookup:”, response.status_code)
if response.status_code != 200:
print(response.text[:300])
return None
data = response.json()[“data”][“attributes”]
return data.get(
“last_analysis_stats”,
{}
)
def find_test_event():
headers = {
“Authorization”: MISP_API_KEY,
“Accept”: “application/json”,
“Content-Type”: “application/json”
}
payload = {
“value”: EVENT_NAME,
“searchall”: True
}
response = requests.post(
f”{MISP_URL}/events/restSearch”,
headers=headers,
json=payload,
verify=False,
timeout=30
)
print(“MISP event search:”, response.status_code)
if response.status_code != 200:
return None
results = response.json().get(“response”, [])
if not results:
return None
event_id = results[0][“Event”][“id”]
print(“Found event ID:”, event_id)
return event_id
def add_enrichment_attributes(event_id, stats):
malicious = stats.get(“malicious”, 0)
total = sum(stats.values())
headers = {
“Authorization”: MISP_API_KEY,
“Accept”: “application/json”,
“Content-Type”: “application/json”
}
hash_attribute = {
“Attribute”: {
“event_id”: event_id,
“category”: “Payload delivery”,
“type”: “sha256”,
“value”: FILE_HASH,
“comment”: “EICAR test-file SHA256 – VirusTotal verified”,
“to_ids”: True,
“distribution”: “0”
}
}
response = requests.post(
f”{MISP_URL}/attributes/add/{event_id}”,
headers=headers,
json=hash_attribute,
verify=False,
timeout=30
)
print(“Hash attribute added:”, response.status_code)
verdict_attribute = {
“Attribute”: {
“event_id”: event_id,
“category”: “External analysis”,
“type”: “text”,
“value”: (
f”VirusTotal: {malicious}/{total} “
“vendors flagged this file as malicious”
),
“comment”: “Automated VirusTotal enrichment”,
“to_ids”: False,
“distribution”: “0”
}
}
response = requests.post(
f”{MISP_URL}/attributes/add/{event_id}”,
headers=headers,
json=verdict_attribute,
verify=False,
timeout=30
)
print(“VT verdict attribute added:”, response.status_code)
print(“Starting VirusTotal enrichment…”)
stats = check_virustotal(FILE_HASH)
if not stats:
raise SystemExit(“VirusTotal enrichment failed.”)
print(“VirusTotal stats:”, stats)
event_id = find_test_event()
if not event_id:
raise SystemExit(f”{EVENT_NAME} event was not found.”)
add_enrichment_attributes(event_id, stats)
print(“Enrichment completed.”)
The script performs four operations:
- Queries VirusTotal using the safe EICAR SHA-256 hash.
- Retrieves the file’s current analysis statistics.
- Searches MISP for the Threat Detection Lab – Suspicious File Test event.
- Adds the SHA-256 indicator and VirusTotal reputation result to that event.
The VirusTotal and MISP API keys are read from environment variables rather than being stored directly in the Python source code.
Because this lab uses a self-signed MISP certificate, certificate verification is disabled only for requests to the isolated local MISP instance. This approach should not be copied directly into a production deployment.
10. Test with a Safe File Hash
For testing, use the SHA-256 hash of a safe EICAR test file, not real malware.
EICAR specifically provides its test file so security products and security teams can validate anti-malware behaviour without distributing a real virus.
Before running the enrichment script, confirm that the following neutral event already exists in MISP:
Threat Detection Lab – Suspicious File Test
Then run:
source ~/.cti_secrets
python3 ~/vt_enrich_public.py
The script searches for the neutral MISP event, checks the EICAR SHA-256 hash against VirusTotal, and writes the hash and reputation result back into the event.
If successful, the script should print the VirusTotal analysis statistics and add them to the selected MISP event.
Return to MISP and open the Threat Detection Lab – Suspicious File Test event. The event should now contain the indicators added by the enrichment process.
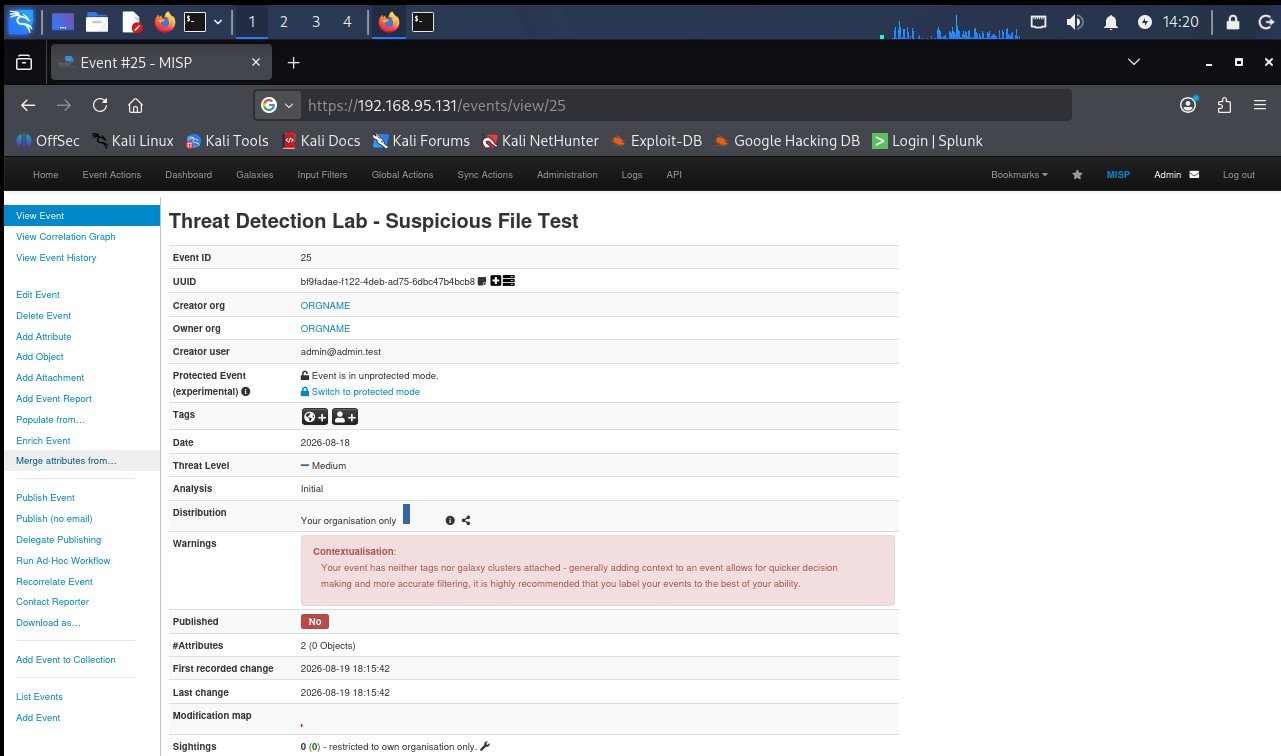
Figure 16. Suspicious-file test event in MISP after threat-intelligence enrichment.
Scroll to the event attributes and verify that the EICAR SHA-256 hash and VirusTotal reputation result were added successfully.
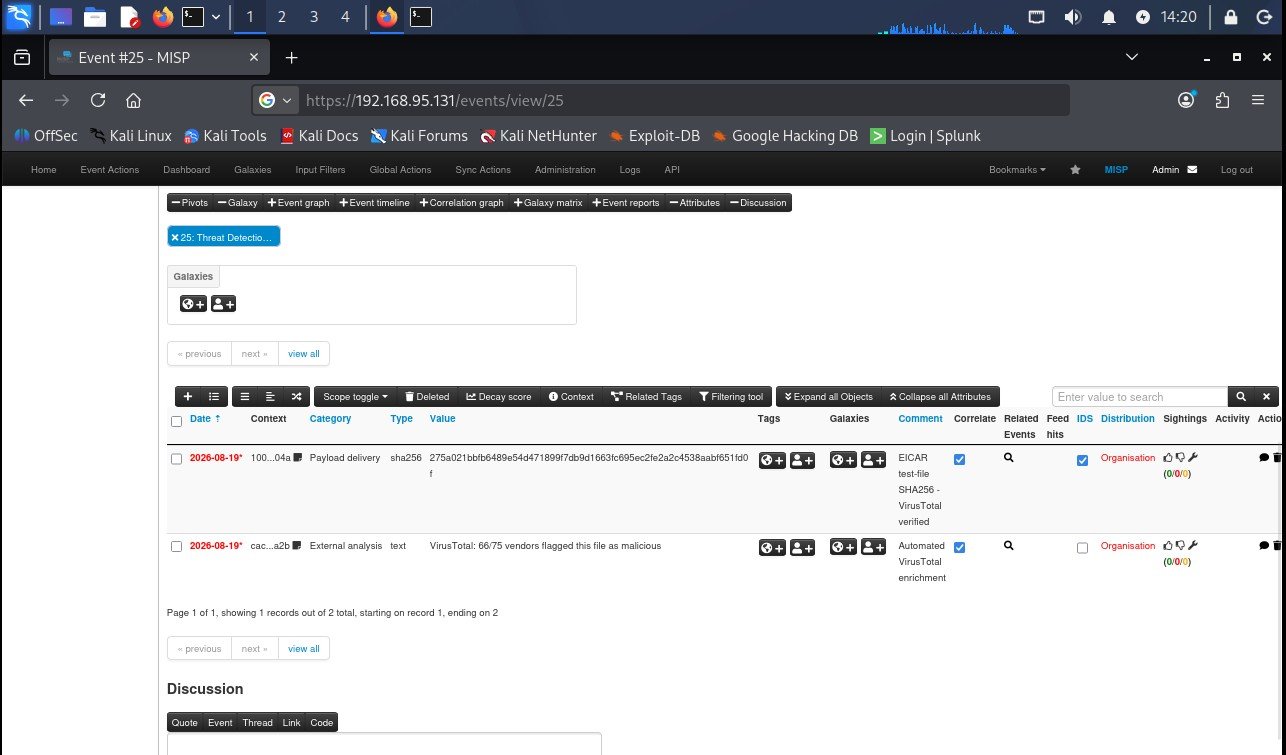
Figure 17. VirusTotal reputation context added to the suspicious-file test event using the EICAR test-file SHA-256 hash.
The event now contains the EICAR SHA-256 indicator together with the VirusTotal analysis result, confirming that external reputation data can be written back into MISP.
11. Understand a 404 Result
If VirusTotal returns:
404 Not Found
do not interpret that as:
File is safe
It means VirusTotal does not currently have an existing object/report for that supplied hash.
A 404 can occur when a custom or newly created test file has no existing VirusTotal report. Using the standard EICAR test-file hash provides a known, safe test case for validating the enrichment workflow.
12. Verify the Intelligence Layer
Before moving to detection logic, confirm:
- MISP-01 remains 192.168.95.131 ✓
- Host-only connectivity still works ✓
- MISP has controlled NAT Internet access ✓
- OTX API access works ✓
- OTX pulse → MISP event ✓
- OTX indicators → MISP attributes ✓
- VirusTotal hash lookup works ✓
- VirusTotal context → MISP event ✓
- Published API credentials are not exposed in screenshots or source-code examples ✓
The intelligence layer should now look like:
┌──── OTX
│
↓
┌───────┐
│ MISP │
└───────┘
↑
│
File Hash ──> VirusTotal
Later, Splunk will feed the internal detection side into this same intelligence workflow.
Threat Intelligence Checkpoint
At this point:
- OTX supplies external threat intelligence;
- MISP stores external and internal indicators;
- VirusTotal provides reputation context;
- private lab IPs remain internal-only;
- API credentials are protected;
- and external intelligence can be accessed without sacrificing the isolated Host-only lab network.
Do not connect the Splunk alert to this workflow yet.
The next section, Building the Detection Logic, should first teach Splunk how to recognise the suspicious-file activity. After that, the Automation & Response Script will connect the Splunk detection to MISP and TheHive.
Prefer the entire lab in one place?
Get the complete Threat-Intelligence-Driven Detection Lab as one structured PDF bringing all four parts, implementation steps, screenshots, architecture, validation, and technical notes together.
If this piece gave you something to think about, you can support my writing here ☕

3 comments