
On this page
1. Introduction – A Home Lab is More Than a Few VMs
A home lab can look deceptively simple from the outside. Install a hypervisor, create a Kali Linux VM, add Windows or Ubuntu, and suddenly you have a “lab.”
But underneath those virtual machines is an entire infrastructure layer that behaves much more like a real environment than it first appears.
Every virtual machine needs compute resources, storage, a network interface, an IP address, a route to other systems, and sometimes a path to the internet. The hypervisor has to decide how traffic moves between the VM, the host computer, other virtual machines, the physical network, and when required, the internet as well.
That is where concepts such as virtual network adapters, virtual switches, NAT, bridged networking, host-only networks, private subnets, gateways, and virtual routers begin to matter.
In this guide, we will break down how a home lab actually works from the ground up. Rather than treating virtualization and networking as separate topics, we will connect them and follow the path from physical hardware to virtual machines, private networks, and the traffic moving between them.
Along the way, we will also see why a lab does not always need direct internet access. Some systems may be deliberately isolated on a private network, while another interface or adapter provides controlled external connectivity when needed.
The goal is not simply to define virtualization or NAT. The goal is to understand what is actually happening when one virtual machine communicates with another system, and what changes when we alter the network architecture.
2. What a Home Lab Actually Is
A home lab is a controlled computing environment used to experiment with systems without depending on production infrastructure.
It might contain only one or two virtual machines, or it might replicate parts of a much larger environment with:
- Windows and Linux systems
- web servers
- databases
- SIEM platforms
- firewalls
- development systems
- monitoring tools
The important part is not the number of machines.
What makes it a lab is the controlled architecture around them.
For example, imagine this environment:
Physical Windows Computer
|
└── Hypervisor
|
├── Kali Linux
├── Ubuntu Server
└── Windows VM
At first glance, these can look like three separate computers.
They are not.
All three ultimately depend on the same physical machine for:
- CPU
- RAM
- Storage
- Physical network connection
The hypervisor sits between those physical resources and the virtual machines and presents each VM with its own virtual hardware.
This shared-hardware model is also why a home lab has practical limits. Every VM you add draws from the same fixed pool of CPU, memory, storage, and network capacity, so the host machine ultimately sets the ceiling on how much infrastructure you can run at once.
That distinction is the foundation of the entire lab and it is what makes resource planning matter as the environment grows.
3. Physical Computer vs Virtual Infrastructure
Before we can understand virtual networking, it helps to separate the home lab into two layers: the physical hardware underneath it and the virtual infrastructure built on top of it.
The Physical Layer
Your host computer contains real hardware resources such as:
- CPU
- RAM
- SSD or NVMe storage
- Wi-Fi or Ethernet adapter
For example, imagine the host has:
- 16 GB RAM
- 8 CPU cores
- 500 GB storage
- 1 physical network adapter
Those resources exist physically inside the computer. Every virtual machine ultimately depends on them.
The Virtual Layer
The hypervisor takes those physical resources and presents portions of them to individual virtual machines.
For example:
Physical Host
│
├── Kali Linux
│ ├── 2 vCPU
│ ├── 4 GB RAM
│ ├── 40 GB virtual disk
│ └── 1 virtual NIC
│
├── Ubuntu Server
│ ├── 2 vCPU
│ ├── 4 GB RAM
│ ├── 50 GB virtual disk
│ └── 1 virtual NIC
│
└── Windows VM
├── 2 vCPU
├── 4 GB RAM
├── 60 GB virtual disk
└── 1 virtual NIC
The VM believes these components are its hardware.
Inside Kali Linux, for example, the operating system sees CPUs, memory, storage, and a network adapter just as it would on a physical computer. But those devices are virtual representations created and managed by the hypervisor.
A virtual disk might actually be a large file stored on the host’s SSD. A virtual CPU ultimately gets execution time on the host’s physical processor. A virtual network interface eventually has to pass traffic through the hypervisor’s networking layer and, depending on the configuration, possibly through the host’s physical network adapter.
The resource limit becomes real very quickly
Notice the RAM allocation in the example above:
Kali Linux      4 GB
Ubuntu Server   4 GB
Windows VM      4 GB
--------------------
Total          12 GB
Those three VMs alone can consume 12 GB of a 16 GB host’s memory when they are running.
That leaves only about 4 GB for the host operating system, the hypervisor itself, browsers, background applications, and anything else running on the computer.
Add another memory-heavy VM and the limit becomes obvious very quickly.
CPU allocation is slightly different. The example assigns six virtual CPUs across the three VMs, but a vCPU is not necessarily a permanently reserved physical CPU core. The hypervisor schedules virtual CPUs onto the host processor as workloads need them. This makes CPU resources more flexible than RAM, but too many busy VMs can still create significant contention.
This is exactly why resource planning becomes part of running a home lab. The architecture may be virtual, but its limits are still determined by very real physical hardware.
Later, when several systems need to run simultaneously, this becomes the difference between a lab that behaves predictably and one that spends most of its time swapping memory, slowing down, or refusing to start another VM.
In my own lab, this became obvious when I tried running five VMs at the same time. Memory became the practical limit long before the architecture itself looked complicated.
4. The Virtual NIC: Where Networking Begins
By this point, the VM already has virtual CPU resources, memory, storage, and other devices presented to it by the hypervisor.
For networking, the most important of those devices is the virtual network interface card, or vNIC.
Inside the guest operating system, the vNIC behaves much like a normal network adapter. Linux can assign it an IP address, use it to send and receive traffic, attach routes to it, and use it to communicate with other systems.
For example, inside Kali Linux we can inspect the available network interfaces with:
ip addrDepending on the hypervisor and Linux distribution, the interface might appear with a name such as:
eth0 or ens33The important point is that Kali treats this interface as a real network device.
But there is no separate Ethernet card physically installed for the Kali VM.
The interface exists because the hypervisor created it and presented it to the guest operating system.
This creates an important question:
If the virtual machine has a network adapter, what is that adapter actually connected to?
On a physical computer, a network interface might connect to a Wi-Fi access point, Ethernet switch, or router.
A virtual network interface needs an equivalent connection.
That connection is provided by the hypervisor’s virtual networking layer.
First practical check
Inside the Kali VM, run:
ip addrLook for the active interface and record:
- interface name
- IPv4 address
- subnet prefix
- whether the interface is up
Then run
ip routeThis shows the routes currently available to the VM, including any default gateway.
Together, these two commands tell us something important:
ip addr shows who the VM is on the network.
ip route shows where the VM knows how to send traffic.
We will use both repeatedly when we compare NAT, bridged, and host-only networking later.
5. The Missing Piece: The Virtual Network
A virtual NIC alone is not useful. Just as a physical Ethernet adapter needs to connect to a switch, router, or wireless network, a virtual NIC needs somewhere to send traffic.
The hypervisor provides that connection through a virtual networking layer.
Conceptually, the path looks like this:
VM
 |
vNIC
 |
Virtual Switch
 |
???
 |
Physical network / other VMs / Internet
What appears at ??? depends on the networking mode.
The three modes we will focus on are:
- NAT
- Bridged
- Host-Only
VMware documents these as common virtual networking modes, with Bridged connecting a VM to the physical network, NAT sharing external connectivity, and Host-Only creating a private network with the host.
These are not simply arbitrary settings in a virtualization menu.
They describe how the virtual network is connected to the rest of the infrastructure.
With NAT, the VM typically reaches external networks through a translated virtual network.
With bridged networking, the VM is connected much more directly to the physical LAN.
With host-only networking, the VM can remain inside a private virtual network without being exposed directly to the physical network.
That difference determines things such as:
- what IP address the VM receives
- what gateway it uses
- whether it can reach the internet
- whether other devices can reach it
- whether it can communicate only with the host or other VMs
- how isolated the lab really is
In the next three sections, we will put something concrete at that ??? and follow the traffic path through each networking mode.
6. NAT – Giving the VM Internet Without Putting It Directly on the LAN
NAT is a common default networking mode for virtual machines because it gives the guest system outbound network access without placing it directly on the physical LAN.
Conceptually, the traffic path looks like this:
Kali VM
   |
Virtual NIC
   |
Hypervisor NAT
   |
Windows Host
   |
Home Router
   |
Internet
The important detail is that the VM usually belongs to a private virtual subnet created by the hypervisor, not the same subnet used by the physical home network.
For example, imagine the physical network uses:
Home Router:    192.168.1.1
Windows Host:   192.168.1.20
while the virtual NAT network uses:
Kali VM:          192.168.226.165
Virtual Gateway:  192.168.226.2
The two networks are different.
Kali can still reach the internet because the hypervisor translates traffic between its private virtual network and the external network.
Inspecting the VM’s NAT address
Inside Kali, run:
ip addrA NAT-connected interface might show something like:
2: eth0: <BROADCAST,MULTICAST,UP,LOWER_UP>
    inet 192.168.226.165/24
The key value is:
192.168.226.165/24That is the VM’s private address inside the virtual NAT network. This is not the same address as the Windows host on the physical LAN.
Finding the VM’s gateway
Next:
ip routeAn example might look like:
default via 192.168.226.2 dev eth0
192.168.226.0/24 dev eth0 proto kernel scope link src 192.168.226.165
The first line tells us where Kali sends traffic when the destination is outside its local subnet:
default via 192.168.226.2That gateway belongs to the virtual networking environment created by the hypervisor.
So when Kali tries to reach a public server, it does not send the packet directly to the physical home router. It first sends it toward the virtual NAT gateway.
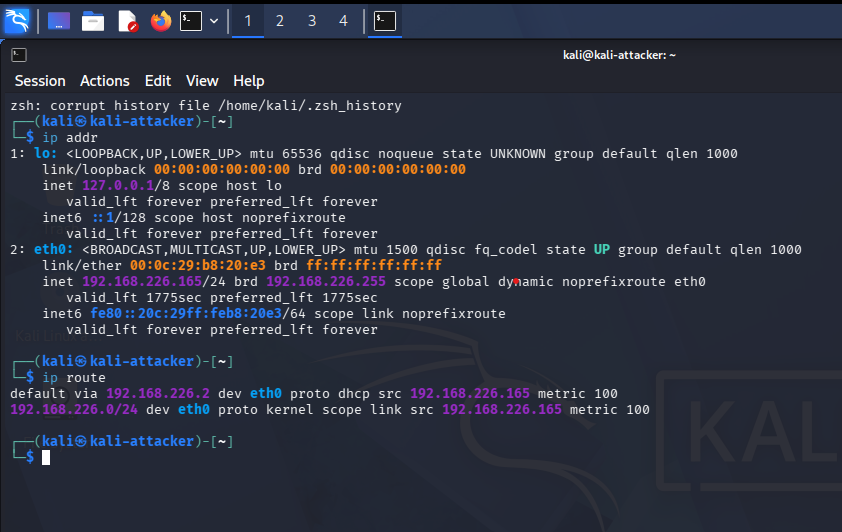
192.168.226.165/24 address and default gateway 192.168.226.2 from the hypervisor’s NAT network.Testing basic external connectivity
We can verify that the VM can reach an external IP:
ping 8.8.8.8If replies arrive, the VM has working IP connectivity beyond its private subnet.
Then test DNS resolution:
ping google.comIf 8.8.8.8 works but google.com does not, the problem is likely DNS rather than general network connectivity.
Private IP vs public IP
Now comes the important comparison.
Inside Kali:
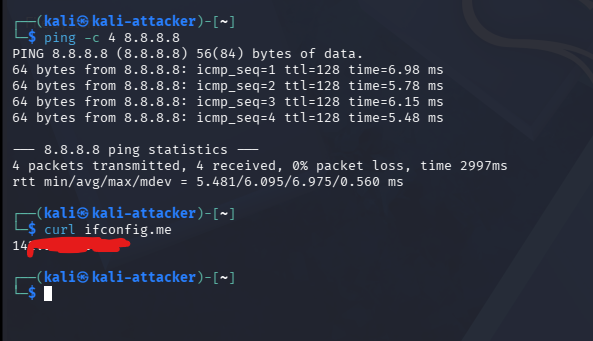
curl ifconfig.meThe command returned a public-facing IP address that was different from Kali’s private NAT address:
Kali private NAT IP:   192.168.226.165
Public-facing IP:      different external address
The public IP has been partially redacted in the screenshot for privacy.
This confirms that Kali is not exposing its private 192.168.226.165 address directly to the internet. Instead, its traffic is translated as it leaves the virtual NAT network.
The simplified path becomes:
192.168.226.165
Kali VM
     |
     v
192.168.226.2
Virtual NAT Gateway
     |
     v
Windows / Physical Network
     |
     v
Home Router
     |
     v
Public-facing IP (redacted)
Public Internet Address
This is the central idea behind NAT:
The VM can communicate outward using a private virtual address while the external network sees traffic coming from a translated address further upstream.
Comparing the VM with the host
On Windows, run:
ipconfigThe physical adapter might show something like:
IPv4 Address . . . . . . . . . . : 192.168.1.20
Default Gateway . . . . . . . . : 192.168.1.1
Now we can compare all three layers:
| Layer | Example address |
| Kali VM | 192.168.226.165 |
| Windows host | 192.168.1.20 |
| Public internet address | Public-facing IP (redacted) |
The addresses differ because they belong to different parts of the network path.
What NAT changes
With NAT, the VM can normally:
- access websites
- download packages
- perform DNS queries
- initiate outbound connections
But another device on the home LAN cannot necessarily initiate a connection directly to the VM just because the VM has internet access.
That distinction is important:
Outbound connectivity does not automatically mean direct inbound reachability.
This is one of the main reasons NAT is useful as a default VM networking mode.
It gives the guest convenient external access while keeping it behind an additional translation layer rather than placing it directly onto the physical LAN.
7. Bridged Networking – Making the VM Another Machine on Your LAN
Bridged networking changes the relationship between the VM and the physical network.
Instead of sitting behind a virtual NAT layer, the VM is connected much more directly to the same LAN as the host and other physical devices.
Conceptually:
                Home Router
               192.168.2.1
                    |
             192.168.2.0/24
        ____________|____________
       |            |            |
Windows Host      Phone       Kali VM
192.168.2.134   192.168.2.30  192.168.2.65
                                  |
                              Bridged NIC
All three systems now belong to the same physical subnet.
That means Kali can potentially receive its address from the same DHCP server as the Windows host and other devices on the network.
For example:
Router:        192.168.2.1
Windows Host:  192.168.2.134
Kali VM:       192.168.2.65
Unlike the NAT example, Kali is no longer hidden behind a separate hypervisor-created subnet.
It is now behaving much more like another physical computer connected to the router.
Confirming the bridged address
Inside Kali:
ip addrA bridged interface might show:
2: eth0: <BROADCAST,MULTICAST,UP,LOWER_UP>
    inet 192.168.2.65/24
Then:
ip routemight return
default via 192.168.2.1 dev eth0
192.168.2.0/24 dev eth0 proto kernel scope link src 192.168.2.65
The important difference is immediately visible.
Kali now has:
192.168.2.65and its gateway is:
192.168.2.1the same physical router used by the Windows host.
That is strong evidence that the VM has joined the physical LAN rather than remaining inside a separate virtual NAT network.
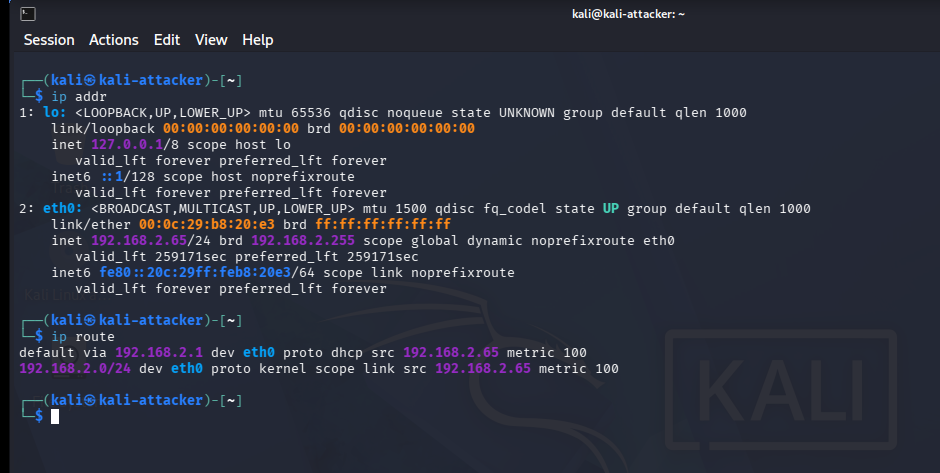
192.168.2.65/24 and using the physical router at 192.168.2.1 as its default gateway.Seeing other systems on the LAN
Because the VM is now part of the same subnet, it can observe neighboring systems much more directly.
Running:
arp -amight produce a trimmed result such as:
_gateway (192.168.2.1) at aa:bb:cc:dd:ee:01
? (192.168.2.134) at aa:bb:cc:dd:ee:20
? (192.168.2.30) at aa:bb:cc:dd:ee:30
Those entries represent systems Kali has learned about on the local network.
The router, Windows host, and other devices now appear as neighboring machines rather than being separated behind the hypervisor’s NAT boundary.
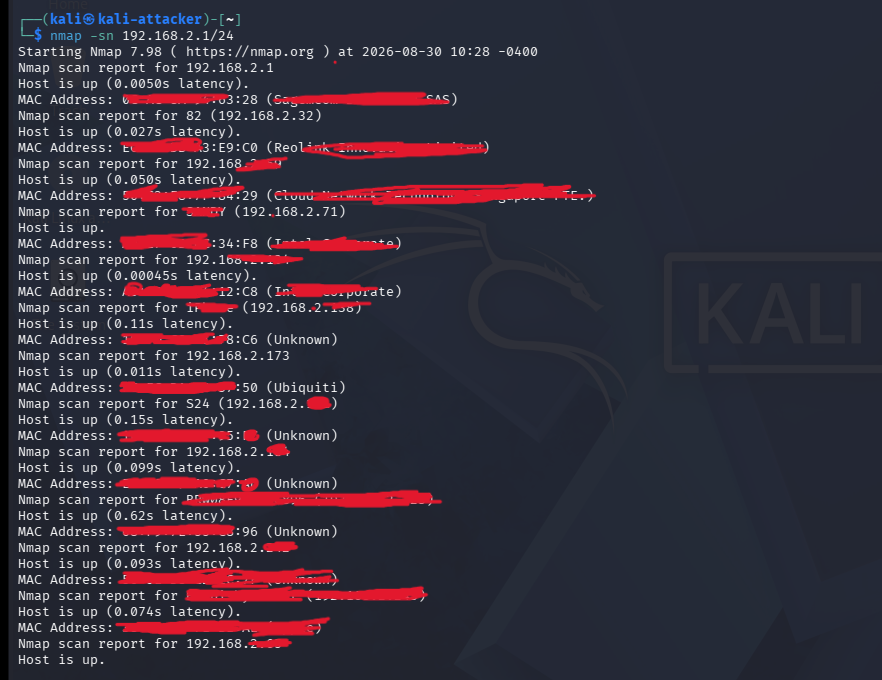
A controlled discovery test on your own network can make this even clearer:
nmap -sn 192.168.2.0/24In Nmap, the -sn option performs host discovery without following it with a port scan.
A shortened result might look like:
Nmap scan report for 192.168.2.1
Host is up.

Nmap scan report for 192.168.2.134
Host is up.

Nmap scan report for 192.168.2.65
Host is up.

Nmap scan report for 192.168.2.30
Host is up.
Now Kali appears alongside the real systems on the LAN.
That is the practical proof of what bridged networking changed:
The VM has become a peer on the physical network rather than a guest hidden behind a separate virtual NAT subnet.
Direct reachability changes too
The effect is not limited to IP addressing.
Because a bridged VM is part of the same LAN, other devices can potentially initiate connections to it directly.
For example, if Kali is running a service on a listening port, the Windows host may be able to reach it using:
192.168.2.65:<port>without needing a NAT port-forwarding rule.
That makes bridged mode useful for things such as:
- testing servers from other physical devices
- simulating machines that behave like normal LAN hosts
- experimenting with local network discovery
- testing client/server applications across real devices
But that convenience also changes the VM’s exposure.
Why bridged networking changes the security picture
A bridged VM is a full peer on the local network.
Other devices can potentially reach services running inside it, and the VM can interact directly with other systems on the same LAN.
That is useful when realism is the goal, but it is also why deliberately vulnerable or untrusted lab machines should not casually be bridged onto a household network where personal laptops, phones, smart devices, or other family systems are connected.
For an intentionally isolated security lab, placing vulnerable systems on a private virtual network is usually much safer than exposing them directly to the physical LAN.
That distinction is one of the main reasons Host-Only networking becomes so important in lab design.
NAT VS Bridged so far
At this point, the difference becomes much easier to see:
| Characteristic | NAT | Bridged |
| VM subnet | Usually separate virtual subnet | Same subnet as physical LAN |
| Default gateway | Virtual NAT gateway | Physical router |
| Internet access | Usually yes | Usually yes |
| Visible as LAN peer | Usually no | Yes |
| Direct inbound reachability | Limited by NAT | Much easier |
| Isolation from home LAN | Greater | Lower |
| Good default for general VM use | Yes | Depends on need |
| Best for intentionally vulnerable lab targets | Usually safer than bridged | Generally not preferred |
The next networking mode goes in the opposite direction.
Instead of making the VM more integrated with the physical LAN, Host-Only networking deliberately keeps communication inside a private virtual environment.
8. Host-Only Networking – Building a Private Lab Network
Host-only networking takes the opposite approach from bridged networking.
Instead of placing the VM onto the physical LAN, the hypervisor creates a private virtual network that exists only between the host and the virtual machines connected to it.
Conceptually:
                    Windows Host
                         |
                Host-Only Virtual Switch
                         |
              192.168.95.0/24
          _______________|_______________
         |        |        |       |      |
       MISP    TheHive   Splunk  Endpoint Kali
By default, systems on this network can communicate with:
- other VMs attached to the same host-only network
- the physical host through its host-only virtual adapter
But they do not have a normal route to:
- the internet
- the physical home LAN
- other devices on the home network
Likewise, devices on the physical LAN cannot simply initiate connections to these VMs.
That isolation is the defining feature of host-only networking.
A real example from the detection lab
This is the exact pattern used in the Chronos & Code threat-intelligence detection lab.
Five virtual machines operate on the private subnet:
MISP       192.168.95.131
TheHive    192.168.95.132
Splunk     192.168.95.133
Endpoint   192.168.95.134
Kali       192.168.95.135
All five systems can communicate with one another because they belong to the same virtual network:
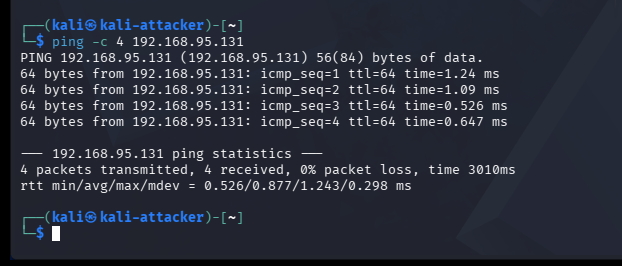
192.168.95.0/24For example, Kali can reach MISP:
ping 192.168.95.131Splunk can receive data from the endpoint:
Endpoint
192.168.95.134
      |
      | log traffic
      v
Splunk
192.168.95.133
and the different services can interact without exposing those systems directly to the household network.
That gives the lab a topology much closer to a small private infrastructure environment:
                    Host-Only Network
                     192.168.95.0/24
                           |
        ___________________|____________________
       |          |           |          |       |
     MISP      TheHive      Splunk    Endpoint  Kali
   .95.131     .95.132      .95.133    .95.134 .95.135
The machines can see each other, but the lab remains separated from the physical home network.
This is one of the main reasons host-only networking is useful for security labs: you can create a functioning multi-system environment without placing every test machine beside your personal computers, phones, and other LAN devices
192.168.95.131 across the isolated 192.168.95.0/24 host-only network.What happens when an isolated VM needs internet access?
Complete isolation creates a practical problem.
Sometimes one machine inside the lab genuinely needs external connectivity.
A threat-intelligence server might need to:
- download operating-system updates
- install packages
- retrieve threat feeds
- query external APIs
- pull indicators from services on the internet
Changing the entire machine from host-only to bridged networking would solve the internet-access problem, but it would also remove much of the isolation we deliberately created.
A cleaner design is to give that VM two network adapters.
That is exactly the pattern used for MISP in the detection lab.
                         MISP
                    192.168.95.131
                      /          \
                     /            \
            Adapter 1              Adapter 2
             Host-Only                NAT
                 |                     |
                 |                     |
      Private Lab Network           Internet
       192.168.95.0/24                 |
                 |                 Threat Feeds
        _________|_________
       |        |         |
   TheHive    Splunk     Kali
The first adapter remains attached to the host-only network.
It preserves MISP’s internal lab address:
192.168.95.131so systems such as TheHive, Splunk, and Kali continue communicating with it over the private lab network.
The second adapter is attached to NAT.
That adapter provides an outbound path to the internet without moving the original lab interface onto the physical LAN.
The result is an important home-lab design pattern:
Keep the internal network private, then give only the systems that need external connectivity a controlled second path outward.
Instead of changing the architecture from Private Lab to Everything connected to the home LAN
we effectively create:
Private Lab
    |
Selected VM
    |
NAT
    |
Internet
That is a much more deliberate design.
Seeing two interfaces inside the VM
With two adapters attached, Linux will normally see two network interfaces.
For example:
ip addr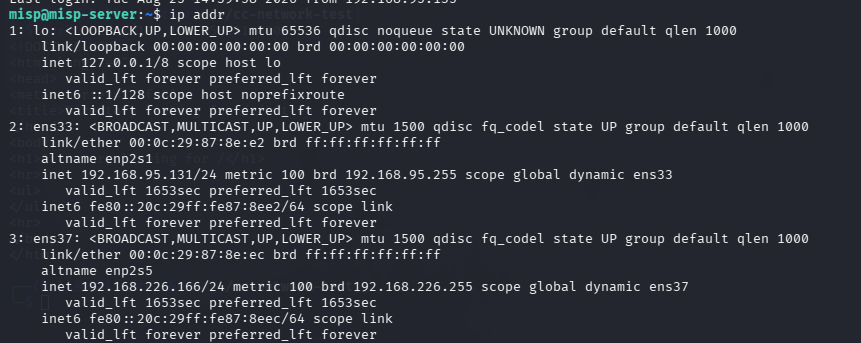
192.168.95.131 for the private host-only lab and 192.168.226.166 for NAT connectivity.In this lab, the output shows two active interfaces:
ens33 — 192.168.95.131/24, connected to the private host-only network
ens37 — 192.168.226.166/24, connected to the NAT network
This means MISP remains reachable by the other lab systems through 192.168.95.131 while its second adapter provides external connectivity through the NAT network.
The routing table then becomes especially important:
ip routebecause the VM needs to know which interface should be used for the private lab and which path should carry traffic toward external networks.
Conceptually:
192.168.95.0/24
        |
        v
Host-Only Interface
        |
       MISP
        |
    NAT Interface
        |
        v
Default Route
        |
     Internet
Traffic destined for another lab machine stays on the host-only network.
Traffic destined for the internet can leave through the NAT adapter.
This is where virtual networking stops being a simple dropdown setting and starts becoming actual network architecture.
Why this isolation matters for security
This is why host-only networking is useful for deliberately vulnerable systems and security labs: the VMs can communicate with each other without automatically gaining a path to the household LAN or internet.
Host-only provides network isolation, but not absolute isolation. Shared folders, clipboard integration, secondary adapters, and other host/guest integrations can still create additional paths.
We will compare the security consequences of NAT, Bridged, and Host-Only directly later in the Security and Isolation section.
NAT, Bridged, and Host-Only compared
At this point, the three modes can be summarized clearly:
| Characteristic | NAT | Bridged | Host-Only |
| Internet access | Usually yes | Usually yes | No by default |
| VM on physical LAN | No | Yes | No |
| VM ↔ other LAN devices | Limited/indirect | Direct | No |
| VM ↔ host | Usually yes | Yes | Yes |
| VM ↔ same private-network VMs | Depends on NAT implementation | Via LAN | Yes |
| Direct LAN exposure | Lower | Highest | Lowest |
| Useful for isolated labs | Sometimes | Generally no | Yes |
| Can add controlled internet separately | – | – | Yes, with a second NAT adapter |
That last row is particularly important.
Host-only does not mean a lab must remain permanently disconnected from everything. It means external connectivity becomes an explicit architectural decision instead of an accidental side effect of attaching every VM to the physical LAN.
9. How Multiple VMs Actually Communicate
Once two VMs are connected to the same virtual network, communication works much like it does between two physical machines on the same LAN.
In the detection lab, for example:
Kali      192.168.95.135
   |
Host-Only Virtual Network
   |
MISP      192.168.95.131
From Kali, we can test basic connectivity:
ping 192.168.95.131A successful result looks like:
64 bytes from 192.168.95.131: icmp_seq=1 ttl=64 time=1.24 msThat response proves Kali can reach MISP across the private virtual network. We can demonstrate the same idea with an actual application service. On a test Linux VM:
python3 -m http.server 8000The server reports:
Serving HTTP on 0.0.0.0 port 8000Then another VM can request the page:
curl http://192.168.95.131:8000and the server logs the incoming connection:
192.168.95.135 - - [30/Aug/2026 10:33:01] "GET / HTTP/1.1" 200 -That final line is the important proof: the server can see the IP address of the VM that contacted it.
This works because both systems share a network path. With host-only, they communicate over the private virtual switch; with bridged, they can communicate through the physical LAN. NAT behavior depends on the hypervisor and NAT configuration, so direct VM-to-VM reachability should not be assumed.
The different subnets used earlier were intentional: NAT, bridged, and host-only represent different network environments. From this point forward, we will use the real lab subnet 192.168.95.0/24 wherever possible.

192.168.95.135 across the private virtual network.10. Adding Services: When the Network Starts Doing Something
Once VMs can communicate, they can start taking on useful roles.
For example:
             Private Virtual Network
                      |
             _________|_________
            |                   |
        Endpoint VM          Server VM
                            ├── Web service
                            └── Monitoring service
The important distinction is that a VM is the machine, while services run inside that machine.
A server VM might host a web application, database, or monitoring service. Another VM might act as an endpoint that connects to those services over the virtual network.
For example, if a web service listens on port 8000, another VM can reach it using the server’s private IP:
http://192.168.95.131:8000At this point, the lab is no longer just several operating systems running side by side. It has become a small infrastructure environment where systems have roles and exchange real traffic.
The same idea can scale into larger projects. In the Threat-Intelligence-Driven Detection Lab, for example, systems such as Splunk and MISP take on dedicated monitoring and threat-intelligence roles while communicating across the private lab network.
11. Adding a Router or Firewall VM
We can take the lab one step further by placing a virtual router or firewall between the private network and the outside world.
Internet
   |
  NAT
   |
Firewall / Router VM
   |
192.168.50.1
  Gateway
   |
Virtual Switch
   |
┌────────┬─────────┐
Kali    Ubuntu    Windows
Now the firewall VM is not just another guest system. It has become part of the lab’s infrastructure.
The other VMs can use:
192.168.50.1as their default gateway, meaning traffic leaving the private subnet passes through the router/firewall VM first.
This creates a much more realistic architecture because the lab can now include:
- routing between networks
- firewall rules
- controlled internet access
- traffic inspection
- network segmentation
Platforms such as pfSense, OPNsense, or a Linux system configured for routing can fill this role.
We do not need to build that architecture in this article, because setting up a real firewall VM is a project in itself.
Building a real firewall VM with pfSense is a project in itself — one I’ll cover in a future Chronos & Code build.
12. Security and Isolation
Networking mode is not just a connectivity setting. It changes what the VM can reach and what can reach the VM.
Bridged
A bridged VM becomes a peer on the physical LAN.
That is useful for realistic network testing, but it also means a vulnerable or compromised VM may be directly reachable by other devices on the same home network, including laptops, phones, and other systems you never intended to involve in the lab.
For deliberately vulnerable targets, that extra exposure is usually unnecessary.
NAT
NAT provides a useful middle ground.
The VM can normally initiate connections to the internet, while devices on the physical LAN cannot directly initiate connections back into the VM by default.
That makes NAT convenient for ordinary development or general-purpose VMs that need internet access without being placed directly on the LAN.
However, NAT should not be treated as a complete containment boundary for hostile workloads.
Host-Only
Host-only networking is designed around isolation.
VMs on the private network can communicate with each other and with the host, but they have no normal route to the physical LAN or internet.
That is exactly why host-only networking is useful for deliberately vulnerable systems, penetration-testing targets, and other security experiments.
If a vulnerable target is compromised, the network architecture helps keep that activity inside the lab instead of giving it a direct path to household devices or an external command-and-control destination.
This is the same reason the detection lab uses a private 192.168.95.0/24 network for its internal systems and adds external connectivity only where it is deliberately needed.
The important limitations
Host-only networking provides network isolation, not absolute isolation.
Features such as:
- shared folders
- shared clipboard
- drag-and-drop
- USB passthrough
- host integrations
- misconfigured secondary adapters
can create additional paths between a guest and the host or external network.
So choosing the right networking mode is only one part of safely designing a lab.
The practical lesson: Bridged prioritizes realism and reachability, NAT balances convenience with some separation, and Host-Only prioritizes isolation.
Choosing the wrong mode for an intentionally vulnerable system is therefore a real security decision, not just a virtualization preference.
13. Common Home-Lab Networking Mistakes
Almost every home-lab networking problem traces back to the same concepts from earlier: network mode, subnet, gateway, DNS, and virtual-switch placement.
VM has an IP address but no internet
First ask whether the VM is supposed to have internet access.
A host-only VM normally has no internet by design. That is isolation, not a fault.
Check the routing table:
ip routeIf there is no default route, the VM does not know where to send traffic outside its local subnet.
Fix: configure the correct gateway, or move/add an adapter using NAT or bridged networking if external access is actually required.
IP addresses work, but domain names do not
Test an IP first:
ping 8.8.8.8Then test a hostname:
ping google.comIf the first works and the second fails, the network path is probably fine and DNS is the problem.
Fix: configure a working DNS server through the VM’s network settings or NetworkManager. On some Linux systems, /etc/resolv.conf reflects the configured resolver, although it may be generated automatically.
Two VMs cannot communicate
Check that both systems:
- are connected to the same intended virtual network
- have addresses in compatible subnets
- use the correct subnet mask
- have active interfaces
- are not being blocked by a host firewall
For example:
VM 1: 192.168.95.131/24
VM 2: 192.168.95.132/24
can communicate directly on the same network, assuming nothing else blocks the traffic.
Fix: attach both VMs to the same virtual switch/network and correct any IP, subnet-mask, or firewall mismatch.
Bridged networking suddenly stops working
A bridged VM depends on the host’s physical network adapter.
Problems can appear if:
- the hypervisor is bridged to the wrong adapter
- the host switches from Ethernet to Wi-Fi
- DHCP fails to assign the VM an address
Fix: check the VM’s bridged-adapter setting, select the correct active physical interface, and renew the guest’s DHCP lease if necessary.
Duplicate IP addresses
Static addressing makes labs predictable, but two VMs cannot safely use the same IP.
A duplicate address can cause intermittent connectivity, failed connections, or traffic reaching the wrong system.
Fix: assign every system a unique static IP or let DHCP manage addresses where fixed addressing is not required.
The useful troubleshooting habit
Before changing settings randomly, identify four things:
Network mode
IP address
Subnet
Default gateway
Then ask:
Where should this VM be able to communicate, and where should it not?
14. Putting the Architecture Together
At this point, the pieces we have discussed can be combined into one larger home-lab architecture.
                         INTERNET
                            |
                     [ Home Router ]
                            |
                    Physical Network
                            |
                     [ Windows Host ]
                            |
                       Hypervisor
              ______________|_______________
             |                              |
        NAT Network                  Private Network
             |                              |
          Kali VM                    Virtual Switch
                                            |
                                  Router / Firewall VM
                                  ├── WAN: NAT Adapter
                                  └── LAN: 192.168.50.1
                                            Gateway
                                              |
                              __________________________
                             |            |             |
                          Windows       Ubuntu        Server
NAT branch: outbound internet access without placing the VM directly on the physical LAN.
Private branch: internal lab communication with no direct internet or household-LAN access unless a route is deliberately added.
The important point is that none of these components exist in isolation.
The VM receives virtual hardware from the hypervisor. Its virtual NIC connects to a virtual network. The selected network mode determines where its traffic can travel. Routes and gateways determine what happens when the destination is outside the local subnet.
Once those pieces are understood, a home lab stops looking like a collection of unrelated virtual machines and starts looking like a small infrastructure environment.
Conclusion
A home lab is not simply a computer running several VMs.
Underneath each VM is a chain of virtual infrastructure:
Virtual Machine
      ↓
Virtual NIC
      ↓
Virtual Network / Switch
      ↓
Gateway or Routing Decision
      ↓
Another VM, the LAN, or the Internet
That is the path we set out to follow at the beginning of this guide.
With NAT, traffic can leave through a translated network while the VM remains separated from direct LAN reachability.
With bridged networking, the VM becomes another peer on the physical network.
With host-only networking, systems can communicate inside a deliberately isolated virtual environment.
And when a private system needs limited external connectivity, additional adapters, routing, or a firewall VM can provide that path without redesigning the entire lab.
Understanding those relationships makes troubleshooting easier, but more importantly, it lets you design a lab intentionally. You can decide which systems should communicate, which should remain isolated, and where external access should exist instead of simply accepting whatever network mode happens to work.
The next step is to use those foundations to build something real.
In the Threat-Intelligence-Driven Detection Lab, multiple virtual machines use a private network to run dedicated monitoring, endpoint, analysis, and threat-intelligence services while keeping the lab separated from the normal home network.
If this piece gave you something to think about, you can support my writing here ☕

2 comments